
Restore Files from Time Machine for Peace of Mind
/
You are backing up your Mac’s data, right? (No? Really? Open System Preferences > Time Machine and set up backups to an external hard drive. We’ll wait. Otherwise, the question is not if you’ll lose data, but when.)

Backups are essential, but many people don’t realize that there’s something even more important: the capability to restore your data in case of a catastrophe. All too often, people believe they’re backing up, but because disasters are rare, they don’t realize the backups aren’t being made properly until it’s too late. And even if your backups are good, you don’t want to learn how to restore while you are stressed out about possibly lost data.
Follow along, then, and let’s restore some data from your Time Machine backup together, so you both know that your backups are working and that you’ll be ready should you need to resort to your backup.
- In the Finder, select the file or folder you want to recover, or if it was deleted, the folder that previously contained it. (For this example, we’ll practice with the iTunes Library.itl file that stores data for iTunes; it’s in the iTunes folder inside your account’s Music folder.)
- Choose Enter Time Machine from the Time Machine menu in the menu bar. (If you don’t see this menu, open System Preferences > Time Machine and select the checkbox for “Show Time Machine in menu bar.”)
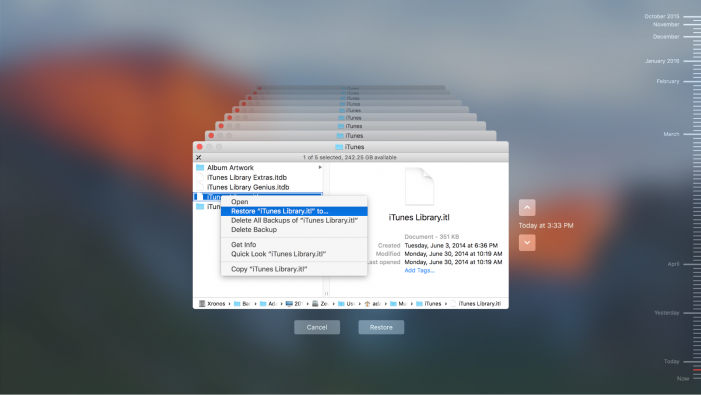
Your selected window moves to the center of the screen, whose background blurs, and copies of the window stack up behind it, each indicating a previous backup. - Find the version of the file or folder that you want, perhaps a backup from a few days ago. You can do this in one of two ways:
- Click the arrows to the right the windows to move back (the top arrow) or forward (the bottom arrow) in time. For each click, Time Machine jumps to the most recent backup in which the files shown in the window were different.
- Use the bars on the right side of the screen to navigate to a particular backup. As you hover over the bars, they expand to display the date of each backup; click a bar to jump to the state of the window at that point in time.
Because we’re just practicing here, we’ll restore to the Desktop instead of the original location. Right-click or Control-click the item you want to restore and choose Restore “filename” To from the contextual menu.
Time Machine switches you to the Finder and opens a Save dialog. Navigate to the Desktop by pressing Command-D, and then click Choose, after which Time Machine restores the file to the Desktop.

If you were really restoring a corrupted or deleted file, you could instead just click Time Machine’s Restore button, which is even easier, since then Time Machine restores the file to its original location. If a file with the same name exists, the Finder prompts you to replace the existing file, keep both copies (which renames the existing file with “(original)” at the end), or keep the original (which cancels the restoration).

That’s it! Try restoring a few more files and folders to the Desktop until you’re comfortable with Time Machine’s interface, and when you’re done, trash everything you’ve restored to the Desktop. To check that your backups continue working properly, restore some files once a month or so.